Injection Molding is one of the most common techniques used in plastics manufacturing in that parts are ‘injected’ into molds to form parts with specific dimensions. This process depends on the plastic part design considerations to achieve efficiency in meeting performance goals and the aesthetical and the cost of these parts. This article reviews the fundamental design features of a plastic part that must be considered while injection molding such as ribs, bosses, gates, sprices, tolerance and their effects, material selection, and rounded corners.
What is Plastic Injection Molding?
The design of the plastic parts entails drawing features of subassemblies and parts to be made of injection molding, a process of forming parts from the molten plastic. This is marked by arriving at the best design that will make parts strong, operational, and inexpensive to manufacture.
Fundamentals of Injection Molding Process
Before understanding the design plastic part, let’s get an overview of the important processes of plastic injection molding. These may include;
1. Melting
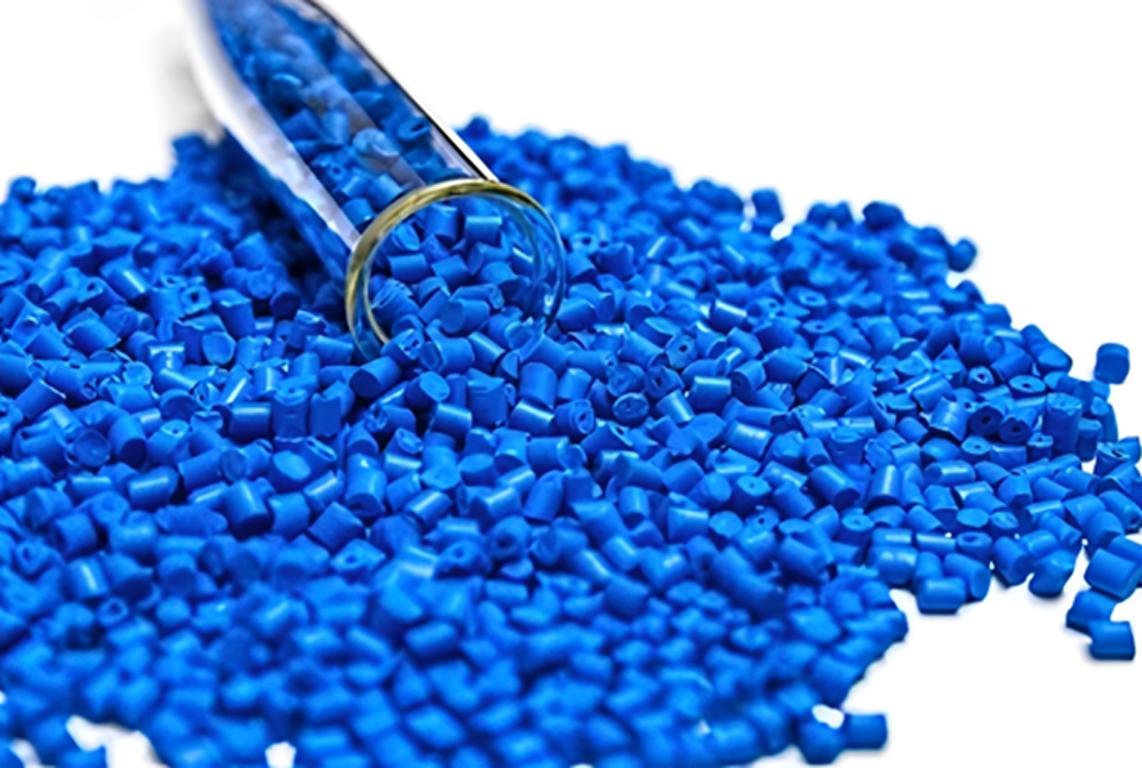
Plastic pellets are supplied to the injection molding machine and then heated till they reach their peak temperature. Here the pellets transform into the liquid form of plastic. This makes the plastic more flexible and can easily be modeled into various forms.
2. Injection
Plastic Injection involves the molten plastic injection into the mold cavity using high pressure. The mold is made in a way that it will create a certain part. Moreover, the pressure ensures that the plastic takes up all of the form of the mold.
3. Cooling
Once the mold has been filled with the plastic material it has to be cooled to harden and then allowed to remove. Cooling can be done with the help of cooling air or water for the mold. This process turns the plastic into hard enough material and can assume the shape of the mold.
4. Ejection
There is one more operation when the hardened plastic is pushed out of the mold if the mold is open during cooling. The part is removed without its destruction by the use of ejector pins or some other methods. Then the mold closes to start again for the next plastic part.
Key Considerations on Plastic Part Design for Injection Molding
When you are working with injection molding, optimized plastic part design is important to make high quality injection molding and competitive injection molding cost. Below let’s discuss the important consideration of plastic part design for injection molding process;
1. Part Geometry
Part geometry plays an important role in dealing with the shapes. So, let’s discuss the different considerations we can opt to increase the effectiveness of injection molding process.
I. Complexity:
The designs are rather simple or complex, this implies that the cost of a mold will depend on the complexity of a part and the design of the mold. Moreover, the complexity of design results in a large number of parts. Flat parts such as a flat panel are cheaper and easy to mold as compared to designing a part with many undercuts or features. One of the industry’s realities is that intricate designs necessitate the development of intricate molds, which in turn means greater cost.
II. Uniform Wall Thickness:
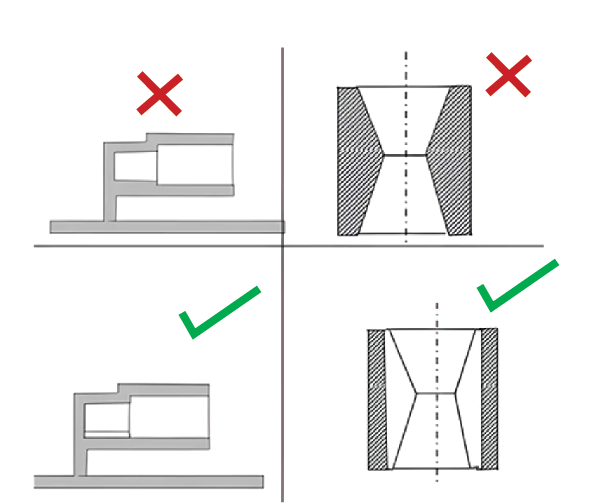
It should be uniform across sections in design work because uniformity results in fewer manufacturing problems. When a part has thin walls and thick walls the cause is usually the different rates of cooling that the part undergoes during the molding process. Such a cooling may lead to warping. Here the material bends or distorts or sinks marks which are dents on the surface because the thick sections take more time to cool down and solidify than thin sections.

2. Draft Angles
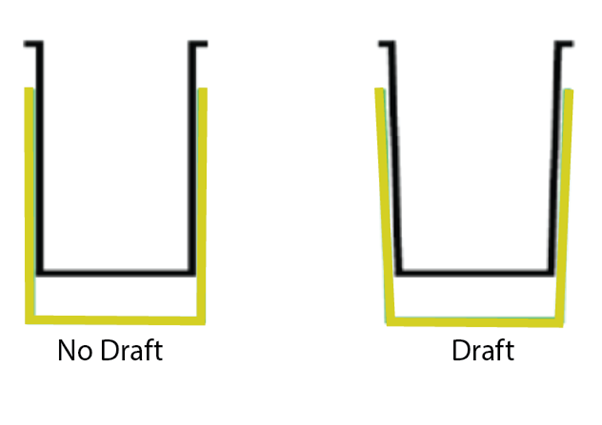
Draft angles are slight rises made to the sides of a part to allow its easy separation from the mold. Without draft angles, the plastic part could become lodged in the mold which will always be challenging to remove without compromising the structural integrity of the part and the material of the mold. It is usual to set up the draft angle that is in the range of 1-3 degrees so that the part can be easily ejected without causing certain troubles.
3. Tolerance and Dimensional Accuracy
Tolerances on the other hand are the acceptable limits of deviation as far as dimensions of a part are concerned. These tolerances must be precise to aptly fit the part and work in the right manner. There are of course some limitations and requirements associated with this including that tighter tolerance such as small variations is possible. However, they will be costly to achieve because molds and quality control have a high tolerance. In contrast to it, the lower tolerance levels are much easier to maintain but at the same time, they probably influence the part’s performance or interference.
4. Ribs and Bosses
I. Ribs
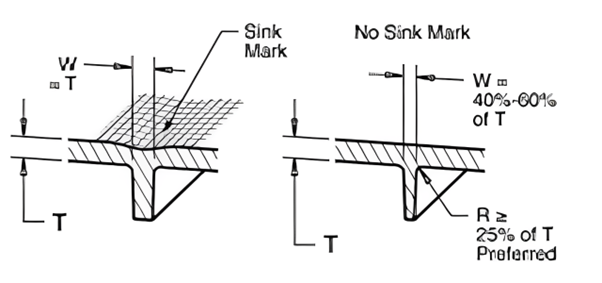
Ribs are extra reinforcing members that are incorporated into the inside of a part to add to its strength and stiffness but contribute slight extra mass to the part. It is used in this way to help avoid warping of the part by giving extra support to the particular portion. Sink marks (these are dents where the rib meets the main wall) should be prevented by having ribs that should be half the thickness of the surrounding walls. This thickness balance assists in cooling and lessens the stress also, The ribs are made from SS 304 grade material to minimize the sag and correct stress.
II. Bosses
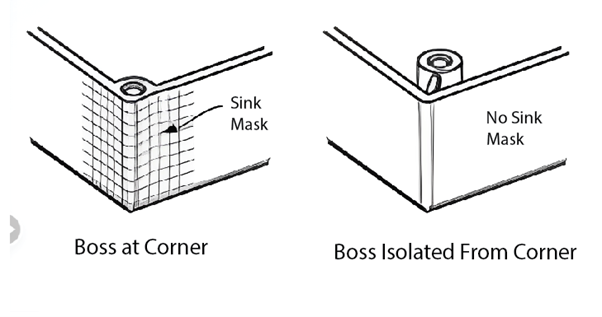
Bosses are characteristic raised protruding parts that mainly serve as anchor points for securing other parts. It has to be stiffened, most often with ribs, to withstand mechanical loading without cracking or transforming its shape. Bosses should also be drawn to adequate thickness so that they can be strong enough to withstand the test of time.
5. Gates and Sprues
I. Gates
They are the points at which the molten plastic gets to flow or enter the mold. Gate placement and design is another important issue that has to be properly put into consideration to ensure that the mold is filled, and more so, to reduce defects. Typically used gates are edge gates, which are positioned on the edges of the part, pin gates which are small gates placed in a specific location and submarine gates which are positioned inside the part. Thus an appropriate design of the gate guarantees the materials are uniformly filled preventing wastage and the development of defects.
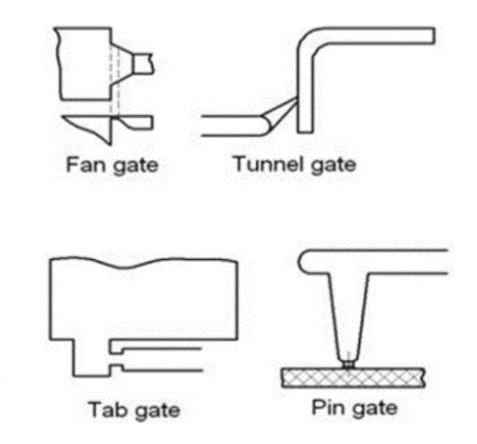
II. Sprues
Sprue is a runner system through which molten plastic is directed into the mold cavity The sprue is usually thicker than other runners and it is often molded separately so that it can be easily broken apart from the rest of the mold when the mold is being assembled. Designing of simple and efficient sprue pattern enables one to cut down the amount of waste material used, in addition to easy withdrawal from the mold. Sprue should be well designed in such a way that it should favor the flow of plastic and also should minimize the amount of plastic that needs to be cut off after molding.
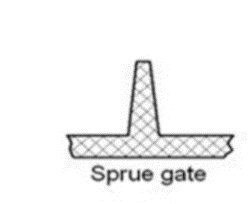
6. Ejection Systems
Function: When the part gets solidified after the cooling, the ejector pins are employed to throw out the part from the mold. Whenever designing the ejector pin it is important to lay around the part in such a manner that it does not mar the part or even cause a bad appearance to it. Good positioning of ejector pins plays a significant role in the easy and proper ejection of the parts from the mold.
| Design Consideration | Guidelines/Important Values | Explanation |
| Complexity | Simpler geometries preferred | Complex designs increase mold cost and difficulty. |
| Uniform Wall Thickness | 1.5 mm – 4 mm | Consistent thickness prevents warping and sink marks. |
| Draft Angle | 1° – 3° | Allows easy ejection from the mold. |
| Dimensional Accuracy | ±0.1 mm – ±0.5 mm | Match with process capabilities for cost-efficient molding. |
| Rib Thickness | 50% of wall thickness | It helps prevent sink marks and improves structural strength. |
| Boss Thickness | 60% – 80% of nominal wall thickness | Ensures mechanical strength and stress handling. |
| Gate Location | Near thick sections, away from visual surfaces | Ensures proper filling and reduces defects. |
| Sprue Diameter | 1.5 mm – 6 mm | Ensures smooth flow of molten plastic. |
| Ejector Pin Location | Away from cosmetic surfaces | Ensures smooth part ejection without surface damage. |
7. Interference Fits
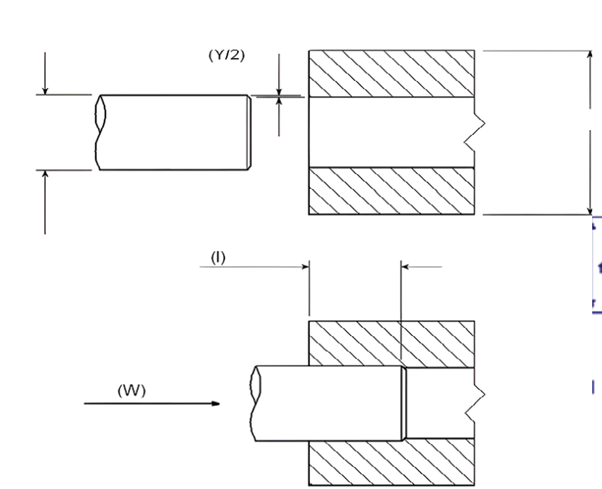
Interference fits are used where holes and shafts are required to be connected in such a way that they are capable of transmitting torque and other kinds of forces efficiently. In interference fits, tolerances and the operating temperature should be well considered to allow reliable connection without a lot of effort in assembly.
The level of interference may be determined by precise mathematical equations that consider design stress, Poisson’s ratio, elastic modulus, and geometric coefficients. The assembly force required for the interference fits is also estimated by these calculations.
8. Fillets and Rounded Corners in Plastic Part Design
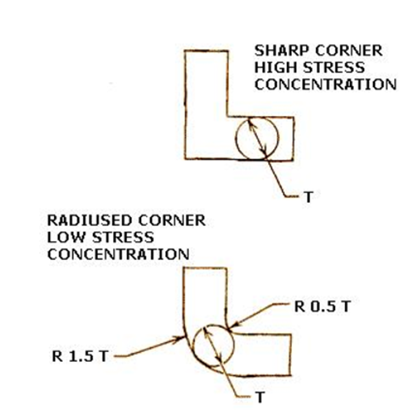
This causes tension concentration and defects on the plastic components in case sharp corners are used. Greater values of fillet size meaning rounded corners lower the stress concentration level and at the same time, allow for free and easier flow of the plastic material during the molding process. It is crucial to create design principles of the corner radius to avoid the problems of uniform wall thickness as well as shrinkage.
9. Holes
I. Through Holes
Holes that pass right through the part thickness are more used and easier to create than other kinds of holes. From a structural point of view, they are easiest to control during mold design. They can be produced by employing fixed cores in both, the sliding and stationary parts of the mold or by having only one core in the sliding as well as in the stationary part of the mold. The former forms two cantilever beams with short arms under the influence of the molten plastic yet undergoes a negligible change.
The latter forms a simply supported beam with negligible deformation. To avoid this condition, one of the core’s diameter should be slightly greater and the other slightly lesser than the other so that all mating faces will be as smooth as possible.

II. Blind Holes
Blind holes, that is, holes that are not drilled through the part, are more difficult to mold. They are generally built using a cantilever beam core and the core tends to bend with the impact of the molten plastic thereby producing holes with uneven shape. Blind holes are holes that end abruptly and generally, the depth of the blind hole should not be more than twice the diameter of the hole.
For blind holes of a diameter equal to 1. its thickness should be 5mm or less while the depth of it should not exceed its diameter. The thickness of the bottom wall of the blind hole should be at least one-sixth of the diameter of the hole to prevent shrinkage.
III. Side Holes
Side holes are made through side cores and it leads to mold cost and mold maintenance since the length of the side cores can be a problem in that they may split. To address such challenges, the design may be made efficient as a way of correcting the current inefficiencies, hence the costs.
10. Snap-Fit Connections in Plastic Part Design
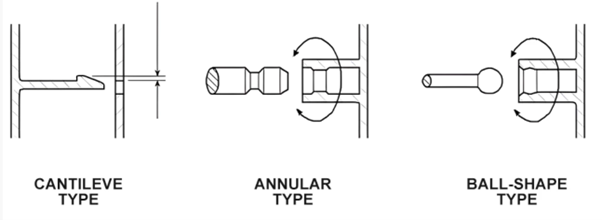
Snap-fit assemblies are easy on the pocket, and friendly to the environment since no other fasteners are required. They are the hooking on of a projecting portion beyond an outward extension on another member in which elastic deformation of the parts permits the formation of an interlocking key. There are mainly three types of snap-fits namely cantilever, annular, and ball shapes.
Two critical angles are involved in the snap-fit design; the retraction side and the entrance side. The retraction side should normally be longer than the gasket side to achieve a better lock-in performance. The allowable deflection of structure can be found by specific equations for a given snap-fit using the material constants and geometrical coefficients.
11. Surface Finish and Textures
The following ways can help us achieve the efficient surface finishes and textures for the final product;
- Achieving Desired Aesthetics: The surface finish of a part not only decides the appearance of the part but also decides the touch feeling of the part. The designer sets the texture or finish depending on aesthetic needs such as matte or glossy.
- Impact of Texture on Mold Release: It is seen that the nature of surface texture plays an important role in determining the ease with which the part can be released from the mold. Complex shapes may interpose certain extra challenges that ought to be extraneous to design to facilitate easy mold release.
- Surface Finishing Techniques: Additional processing which includes polishing, sanding, or applying a final coat can be employed to get the optimal finishing.
12. Tolerances and Dimensional Stability
So, the following considerations will also help increase the efficiency of plastic part designs.
- Designing for Tight Tolerances: Components with more stringent tolerance levels provide a challenging environment for mold design with increased control issues of the actual molding process. Some important points should be considered to provide for the differences in material flow and cooling.
- Accounting for Material Shrinkage: To control material shrinkage, the designers are required to set the size of the mold cavity slightly smaller. Using this format helps in ensuring that the final part meets the necessary dimensions that are required.
- Tooling Considerations: The tool should therefore be accurate in the dimensions and well-maintained to enhance the dimensional stability of the molded parts.
13. Material Selection
Users are therefore encouraged to ensure that they select the appropriate material that will enable them to achieve the required performance of molded parts. All thermoplastics including the amorphous and the semi-crystalline variety have their own characteristics. Factors include the mechanical strength of materials to be incorporated and their crystallization as well as their hygroscopicity.
14. Mold Flow Analysis
The design part also involves the mold flow analysis. So, we can optimize it using the following process;
- Importance of Simulating Material Flow: The mold flow analysis aims to determine how the molten plastic is expected to flow within the mold. So, it can help identify areas of air trap, weld lines, and uneven flow.
- Identifying Potential Issues: It can be evidenced that simulation can identify some issues before manufacture, which the designers can correct for the part of the mold design.
- Optimizing Part Design for Mold Flow: Changes that can be made based on mold flow help to improve the part quality and minimize defect rates.
15. Prototyping and Testing
So, here are some prototyping and testing techniques we can use for the effectiveness of the design part.
- Using Rapid Prototyping Techniques: Techniques like rapid prototyping help designers build prototypes of the spare part and test and assess the physical part before adopting it for manufacturing.
- Conducting Physical Testing: Prototypes subjected to testing incorporating this part enable evaluation of the part for its performance, durability, and capability of the part in fulfilling the intended function. It gives additional value as it gives some idea about the improvements that can be made in its design.
- Iterating Designs Before Final Production: Based on the testing results, it might be possible to adjust the part design and work on its problems as well as improve its performance.
Common Design Mistakes and How to Avoid During Design
Here are some important mistakes we should avoid when designing plastic parts.
- Poor Material Selection: Selecting an improper material thwarts part performance and the manufacturability of that part. There is a need to choose the right materials that shall meet the needs of the part.
- Ignoring Draft Angles: For example, having small draft angles can result in problems with part ejection and wearing of the mold. Make sure that draft angles are included in the layout.
- Overcomplicating Part Geometry: Such shapes complicate the mold and its manufacturing and raise the cost of the mold. Lessen the complexity of the designs as much as possible to increase their manufacturability.
- Inadequate Wall Thickness: Porosity, inconsistency in thickness, or variations in the wall thickness adversely affect the product with problems such as warpage and sink marks. It’s important to keep the wall thickness of the part constant to avoid variations in the thickness of the walls.
Conclusion
In conclusion, several factors should be considered while designing a plastic part for injection molding, i.e. hole types, bosses, snap-fits or interference fits, and many others such as tolerances, materials required, and corner radii. With appreciation of these principles, the designers can develop molded parts that are of good quality, long-lasting, and cheap to manufacture. Designing designs according to the project characteristics and environmental conditions guarantees the best results and stability.
Frequently Asked Questions
Q1. Why is part design important in injection molding?
It will help us realize procedural and operational effectiveness. Because, the manufacturing design incorporates strategies that can effectively produce the part with high accuracy, fewer defects, and reduced use of material.
Q2. What are Through holes?
Through holes are those holes that pass through an entire part, they’re relatively easier to mold and control.
Q3. What are blind holes?
Blind holes do not extend through a part and may by be more difficult to mold since the hole may get bent and deformed.
Q4. What do side holes in injection molding refer to?
Side holes are made with side cores which may add to the mold complexity and hence to the injection mold cost.
Q5. How should bosses be designed?
There should also be fillets at the connections and proper injection molding wall thickness. So, they can help withstand the stress of the part. Moreover, bosses must also be included in the structure of the part.
Q6. What is the meaning of a snap-fit connection?
In the snap-fit connection, one part is elastically deflected to fit into another so that no direct mechanical fasteners are used.
Q7. How do we compute for the interference that should be made?
Interference is obtained by design stress, Poisson’s ratio, and geometrical coefficients.
Q8. What are tolerance levels in injection molding of plastics?
Tolerance limits comprise general-purpose, medium, and high-accurate tolerances, which determine the quality and prices of the injection molding products.

