Mold Design For Injection Molding
The first step in mold designing for injection molding is to obtain the necessary data. This entails figuring out how many cavities there will be, choosing the material for the mold, and gathering relevant information. This may necessitate working with specialists like material engineers and tool makers, cost analysts. Even though the molding material is usually not chosen by the mold designer, successful mold design requires a grasp of several important factors. Check the plastic part ribs design tips.
Material Choice for Mold Design
Understanding the properties of the molding materials is essential when designing injection molds. varying materials and even grades have different shrinkage rate, so it is import to confirm this first thing before start mold design, because if the shrinkage have set in the mold design, later on you can not change to other shrinkage material, because that will change to the part dimensions. Some plastics are better at absorbing and dissipating heat, which affects how well the mold cools down. This may affect where the mold’s cooling channels are located, and gate, runner, and vent designs are greatly influenced by the plastic’s viscosity.
Considerations for Shrinkage
A key consideration in mold design is shrinkage rate, or the contraction phase that occurs in polymers. The amount that a part will shrink after being taken out of the mold is determined by the shrinkage factor that is allocated to each type of plastic. Plastics can shrink in an anisotropic or isotropic manner. Similar to amorphous materials, isotropic materials shrink uniformly in all directions. On the other hand, anisotropic materials—which are frequently crystalline—may exhibit greater shrinkage along the flow direction.
For example, to attain the necessary size after shrinkage, a 6-inch product with a shrink factor of 0.010 in./in. needs a mold cavity of 6.060 inches. The three categories of shrink factors are as follows: low, which falls between 0.000 in./in. and 0.005 in./in., medium, which falls between 0.006 in./in. and 0.010 in./in., and high, which falls beyond 0.010 in./in.
Applying shrink factors to each inch of the product has an effect on all of its dimensions. Three categories of shrinkage—low, medium, and high—have an impact on the dimensions of the mold cavity. Shrinkage may be impacted by mold temperature fluctuations as well as modifications to the product’s wall thickness. It’s difficult to estimate shrinkage; material suppliers, moldmakers, and seasoned molders must all weigh in. if you are not know what shrinkage should you use, no need to worry, only need to tell us about the material you prefer to use for your project, and we will handle the rest for you.
Below table is shrink rate for most popular materials
| Full name of Material | Short name of material | Min to Max Shrink Values |
| Acrylonitrile Butadiene Styrene | ABS | .004 – .008 |
| Acrylonitrile-Butadiene Styrene/Polycarbonate | PC/ABS | .004 – .007 |
| Acetal | POM | .020 – .035 |
| Acrylic | PMMA | .002 – .010 |
| Ethylene Vinyl Acetate ( | EVA | .010 – .030 |
| High Density Polyethylene | HDPE | .015 – .030 |
| Low Density Polyethylene | LDPE | .015 – .035 |
| Polyamide – Nylon (PA) Filled 30% Glass Fiber | PA+30GF | .005 – .007 |
| Polyamide – Nylon (PA) Unfilled | PA | .007 – .025 |
| Polybutylene Terephthalate | PBT | .008 – .010 |
| Polycarbonate | PC | .005 – .007 |
| Acrylonitrile Styrene Acrylate | ASA | .004 -. 007 |
| Polyester | .006 – .022 | |
| Polyetheretherketone | PEEK | .010 – .020 |
| Polyetherimide | PEI | .005 – .007 |
| Polyethylene | PE | .015 – .035 |
| Polyethersulfone | PES | .002 – .007 |
| Polyphenylene | PPO | .005 – .007 |
| Polyphenylene Sulfide | PPS | .002 – .005 |
| Polyphthalamide | PPA | .005 – .007 |
| Polypropylene | PP | .010 – .030 |
| Polystyrene | PS | .002 – .008 |
| Polysulphone | PSU | .006 – .008 |
| Polyurethane | PUR | .010 – .020 |
| Polyvinyl Chloride | PVS | .002 – .030 |
| Thermoplastic Elastomer | TPE | .005 – .020 |
Determining Cavities in Mold Design for Injection molding
Finding out how many cavities are required is an important first step before discussing mold size and equipment requirements. This parameter is crucial in determining how much can be produced by the injection molding process in a specific amount of time, together with the overall cycle time.
The yearly production volume targets for a certain product are directly related to the number of cavities needed. For example, the computation requires knowing the annual production time available if the goal is to create 100,000 units on average annually. This is 6,240 hours a year (52 weeks * 5 days/week * 24 hours/day), assuming a typical workweek of five days and 24 hours per day. Then, every month has an average of 520 available hours (6,240 / 12).
Estimating Cycle Time
Estimating the cycle time is essential to figuring out how many cavities are needed. The thickest wall portion of the item being molded has the biggest impact on the cycle time. A guideline for this estimation is shown in Figure 2-3, which takes into account the assumptions of an appropriately sized molding machine and typical injection process times. Although cycle times may vary significantly depending on the material, the chart provides a useful starting point.
Once the total cycle time has been approximated, the number of cycles per hour can be computed by dividing the estimated cycle time by 3,600, which is the number of seconds in an hour. For instance, 100 molding cycles are produced per item if the maximum wall thickness is 0.100 inches and the cycle time is roughly 36 seconds.
Cavities and Production Scale
Suppose we have an annual requirement of 100,000 units. To satisfy this criterion, a single-cavity mold would require about 1,000 hours, or 8.33 weeks. As an alternative, the production time might be cut in half to 4.16 weeks with a two-cavity mold. A two-cavity mold’s financial ramifications, however, must be carefully considered.
A single-cavity mold operating nonstop would not be feasible for larger manufacturing numbers, such 10 million units annually. In this instance, 624,000 units might be produced annually using a 16-cavity mold. Multiple molds with 16–32 cavities each might be considered, with production spaced out over three to six months, in order to reach 10 million pieces. However, it’s important to assess aspects like cost and the availability of molding equipment.
Selecting the Right Material for Injection Mold Design
Choosing the appropriate material for injection mold design is a critical aspect that significantly influences the efficiency and effectiveness of the molding process. Various materials, ranging from steels to alloys and even aluminum, offer unique characteristics catering to different molding requirements.
Steels
- 1020 Carbon Steel: Ideal for ejector plates and retainer plates due to its machinability. Carburization is required for hardening.
- 1030 Carbon Steel: Used for mold bases, ejector housings, and clamp plates. Can be easily machined and welded, with the potential for hardening to HRC 20-30.
- 4130 Alloy Steel: High-strength steel suitable for cavity and core retainer plates, support plates, and clamping plates. Supplied at 26 to 35 HRC.
- S-7 Tool Steel: Shock-resistant with good wear resistance, used for interlocks and latches. Hardened to 55-58 HRC.
- P-20 Tool Steel: Modified 4130, pre-hardened for cavities, cores, and stripper plates. Supplied at HRC 28-40.
- S136 stainless steel: This is one of the best harden material for cavities, cores, inserts an other forming mold components, hardened to 50-54 HRC.
- NAK80 high polishing steel: Used for high glass surface finished cavities, cores and other mold inserts, pre-hardened to 38-42HRC.
- 1.2344 and 1.2343 steel? This is harden steel that mostly used for cavities, cores, and other mold components, hardened to 50-54 HRC.
Aluminum
The most common aluminum grade for molds is 7075 (T6). This aircraft-grade alloy, when anodized, achieves a surface hardness of up to 65 Rc for enhanced wear resistance. It can be used for the entire mold, and its surface tends to self-smooth, reducing mold build and injection molding cycle times.
Beryllium-Copper Alloys
These alloys, such as CuBe 10, CuBe 20, and CuBe 275, are often used as components fitted to steel or aluminum mold bases. They assist in heat dissipation, particularly in areas with challenging cooling channel placements. The hardness ranges from Rb 40 to Rc 46.
Other Materials
While less common, other materials like epoxy, aluminum/epoxy alloys, silicone rubbers, and wood can be used for molds, primarily for small-volume or prototype production (typically under 100 pieces). These materials are not suited for high-volume production due to their limited durability and may be more appropriate for prototyping purposes.
In recent times, aluminum, especially the 7075 alloy, has become a viable option even for high-volume production, challenging the traditional perception of aluminum being suitable only for low-volume or prototype molds. The choice of mold material should align with production volume requirements, material compatibility, and the specific characteristics needed for the molding process.
Surface Finish and Special Requirements in Mold Design for injection molding
When it comes to molded product design, getting the right surface look is important, both aesthetically and in terms of making finishing touches like brand logos or ornamental artwork easier to apply. The parameters of the injection process and the state of the mold cavity have a direct impact on the molded surface quality. Mold designers cannot control processing parameters, but they must specify criteria for specific appearances in order to fabricate molds with the right surface conditions.
Different machining techniques produce different degrees of surface roughness on mold surfaces, which affects the finishing procedure. For example, common finishes produced by Electrical Discharge Machining (EDM) range from 10 to 100 microinches (250 to 2,500 micrometers). It may only take less than 1 microinch (25 micrometers) to get a mirror finish.w hile an average reading for most parts might fall between 20 to 40 microinches (500 to 1,000 micrometers).
A smoother cavity finish reduces the hills and valleys that are produced during machining, which usually makes it easier to eject molded pieces. The effect of EDM on cavity surface roughness is shown in Figure 2-4, which highlights the necessity of appropriate stoning and polishing in order to provide the required smoothness. For mold cavity surface finishes, the Society of the Plastics Industry (SPI) has created standards. There are three levels (1, 2, and 3) in each grade (A, B, C, and D), with A-1 being the smoothest finish and D-3 being a coarse, dry-blasted finish.
Although a flat surface facilitates ejection, too smooth surfaces might generate a vacuum, especially when using stiff, hard resins. In these situations, a small amount of surface roughening on the metal aids in removing the vacuum and enables appropriate part ejection.
If post-molding finishes are applied, the molded part’s surface requires preparation. For polyolefins, oxidation of the surface is necessary to facilitate the adhesion of paint, dye, hot-stamps, or other decorative finishes. Minimizing the use of mold release agents during injection molding is advisable to avoid interference with adhesion, further emphasizing the importance of a highly polished mold surface.
Identifying surfaces designated for post-molding decoration on product drawings is essential. This notification ensures that moldmakers and molders recognize critical areas requiring special attention in the finishing process.
Gate Method and Location
The final quality, appearance, and physical attributes of a molded product are influenced by the gate’s location and the type of gating system employed. Ideally, the cavity should be gated so that the molten material enters the thickest section of the part first, as illustrated in below picture.
This concept is grounded in the behavior of molten plastic molecules, which tend to occupy available space and seek equal air distribution. Placing the gate in the thickest part of the cavity forces the molecules together, compressing them as they travel into the cavity. This compaction expels air between the molecules, resulting in a densely packed molecular structure and a molded part with optimal structural integrity.
Contrarily, gating at the thin end allows the molecules to expand, increasing the air spaces between them and leading to a weaker molecular bond. This results in a molded part with low structural integrity.
While the ideal gate location and design will be explored in a subsequent chapter, it is crucial to recognize potential gate locations at this stage. Identifying these locations enables proactive communication with the product designer to address any issues. Gates, regardless of type, will leave evidence, known as a vestige, either protruding from or broken into the molded part. It will never be perfectly flush with the molded part. If the vestige hinders the function, appearance, or intended use of the molded part, the gate may need relocation, a decision in which the product designer should be actively involved.
Ejector Method and Location
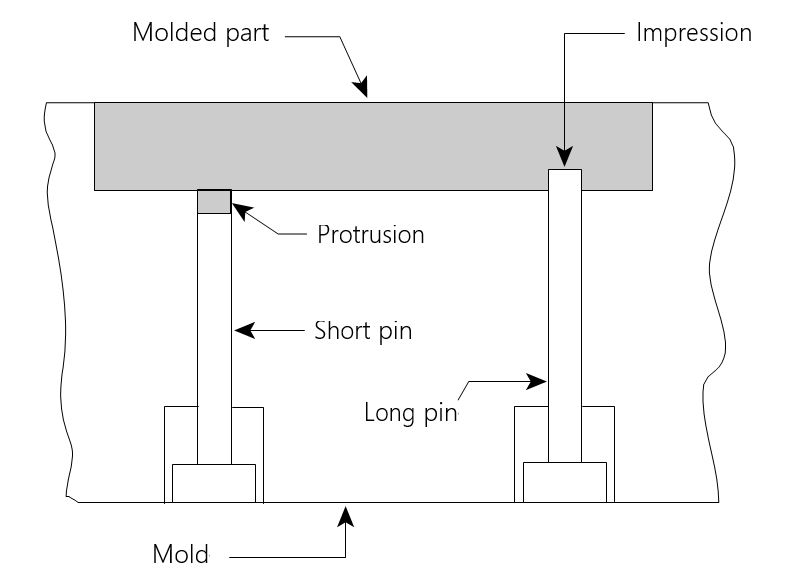
After the molten plastic has solidified within the mold, the final molded product needs to be ejected from the mold. The predominant method for this task involves the use of ejector pins, which are employed to push the molded part out of the cavity where it took shape, as depicted in below picture.
To optimize the ejection process and minimize stress, it is advisable to use ejector pins with a larger diameter. This ensures an even distribution of ejection force across the molded part, reducing the risk of cracks or punctures caused by insufficient ejector area. Ideally, ejector pins should be strategically positioned to apply force to the strongest areas of the part, such as near corners, under bosses, and close to rib intersections. Although round ejector pins are the most common and cost-effective, rectangular cross-sections are also viable.
Similar to gates, ejector pins leave traces on the molded part. Due to the continual expansion and contraction of various mold components during the molding process, achieving perfect flushness with the part’s surface is challenging. Consequently, if the pins are too short, they leave a protrusion or excess plastic pad, known as a witness mark, as illustrated in below picture. Conversely, if the pins are too long, they create impressions in the plastic part.
It is crucial to strike a balance in pin length. Excessively long pins can lead to the molded part remaining on the ejector pins, posing the risk of damage if the mold closes on the non-ejected part. Consequently, it is prudent to intentionally keep the pins short, resulting in a thin pad of excess material. Product designers must be informed of the intended locations of ejector pins and the resulting witness marks to make informed decisions regarding acceptance.
If the witness marks are deemed unacceptable due to functional or aesthetic considerations, alternative ejection methods, such as a stripper plate or an advanced air blast system, may need to be explored. Alternatively, repositioning the part in the mold to allow for the relocation of ejector pins is another option, albeit one that may incur higher mold costs.
Location of Cavities and Cooling Channels
When employing a single-cavity mold, it is optimal to position the cavity at the center of the mold. This configuration facilitates sprue gating, creating favorable conditions for the molding process. Material injection occurs directly into the cavity, minimizing travel distance. With no constraints, injection pressure can be reduced, and stress is effectively minimized. These conditions are sought even in multicavity molds.
In the case of multicavity molds, it is essential to place the cavities as close to the center of the mold as possible. However, considerations must be given to the need for ejector pins for both the parts and the runners responsible for transporting material to the cavities. Additionally, cooling channels must be strategically placed in the mold plates to bring coolant, typically water, as close to the mold cavities as possible without compromising the integrity of the steel and causing water leaks.
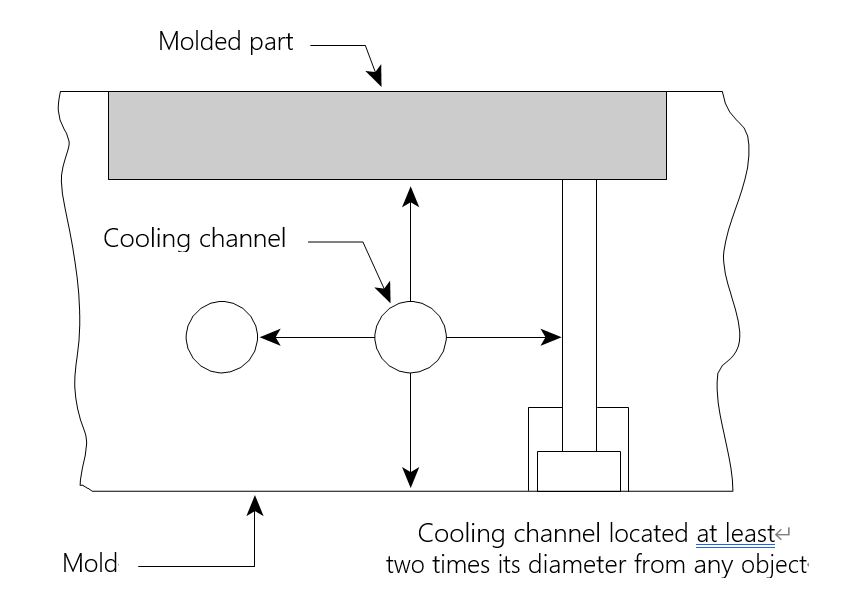
It is important to carefully position the cavities to avoid interference with mounting bolts and ejector pins. As the number of cavities increases, the layout becomes more intricate, making the process more challenging. A general guideline is that cooling channels should be situated no closer than twice their diameter from any other object, as depicted in below picture. This ensures there is enough surrounding metal to minimize the risk of breakthrough.
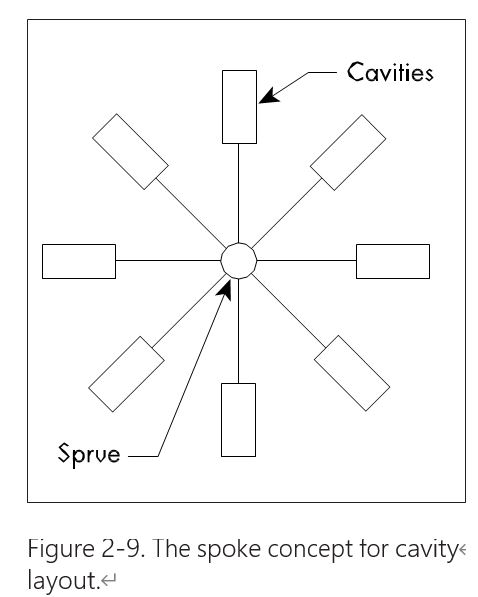
An ideal layout for a multicavity mold resembles spokes in a wheel. This layout allows the cavities to be positioned as close as possible to the center of the mold and eliminates right-angle turns in the runner system. Such turns result in a 20% pressure drop for each turn, necessitating an increase in the runner diameter to maintain proper material flow. This escalation leads to higher material costs and longer cycle times and should be avoided whenever feasible. below picture illustrates a typical spoke layout for an eight-cavity mold.
Despite the advantages of the spoke concept, it comes with a limitation on the total number of cavities possible within a given mold size. A squared pattern, as shown in Figure 10, can accommodate more cavities. However, squared patterns introduce turns in the runner system, often represented as right angles. Right-angle turns demand additional injection pressure to propel material through, prompting a 20% increase in the primary runner diameter to balance pressures. If squared patterns are necessary, it is preferable to have runners with sweeping turns instead of right angles,

Figure 10
Regardless of the runner system employed, ejector pins are essential for ejecting both the runner system and the molded part. Therefore, the cavity layout must consider not only the proximity of cavities to the mold’s center for minimal material travel but also how to avoid placing ejector pins (and mounting bolts) in the middle of cooling channels.
Above items are only a general requirements regarding mold design for injection molding, there will be some more requirement, such as Venting Concepts, Dimensioning of Mold, mold slider or lifter, and so on, to design a mold is not easy skill. if you want to have mold design for injection molding, you can contact us for a quote.
Injection Mold Design Case Study from Sincere Tech – DFM Anylisis
In order to be able to think in the same way within SinereTech, and to be able to use dimensions that are suitable for all applications we have created the following guidelines. Those mold design guidelines will be used by the calculation engineers as well as a base for our designers in case of any Injection mold project, and sometimes we may call this as DFM report anylisis as well.
-
Injection gate and overall layout.
- Generally, the injection gate will be placed along the longest side of the part and the injection gate cylinder will be on the closest distance to that side (runner will normally not go around the cavity like a banana).
- If sliders are used or if other factors may influence the placement of the injection gate or runner, provides some gate location suggestion and ask the customer which gate location they prefer. Agree with a solution before the mold design. Then the general layout will be suitable for almost all mold.
-
Distance between the cavity edges and the insert edges.
- For normal cases, except for injection molds with bigger sliders or “deep” parts, use the distance 50-80mm. The upper limit is used for “bigger” parts and the lower limit is for smaller parts.
- For plastic injection molding tool with bigger sliders the distance can be up to 90-100mm, especially when it concerns the two sides to right and left from the slider side.
- For really deep parts the distance may be bigger than 100mm, but then we should ask the customer for advice if suitable the customers injection molding machine.
- For really small parts the minimum distance of 50mm is used.
- The distance for the side towards the injection cylinder is the same as for the other sides, but about 10-15mm on top of that.
- In case we would like to optimize this distances. This can preferably be used for this type of die casting tools
-
Distance between cavities.
- Generally, between each cavity, a distance of 30-50mm is used for most cases.
- For really small parts the distance of a minimum 15-30mm is used.
- For really deep parts the distance is generally bigger than 50mm, but then we should ask the customer for advice if the injection mold size is fitting to the customer’s machine.
- For cases when the runner is between the cavities the distance will be min 30-40mm between each cavity, use use banana gate then the desitance between each cavity will be extra 10mm more.
-
Distance between the edge of the insert and the edge of the mold base.
- Generally (for normal cases) the rule is to use the same distance as what is used for injection moulding (as long as the part do not require big sliders). That includes bigger parts, deeper parts and parts requiring smaller sliders. That means a distance of 60-90mm is OK for most molds.
- For molds with big hydraulic sliders, there is a need to increase the distance with 50-200mm on top of the normal distance (more than what would have been needed for injection moulding). However, for those cases, we should ask the customer for approval. One question is also how asymmetrical the mold can be in case a big slider is only used on the right or left side of the mould.
-
The thickness of A/B plates and inserts.
1. The thickness for both the inserts and A/B plates are mainly controlled by the part projected area. As a rule of thumb thicknesses specified in below table will be used when designing die casting molds. The projected areas are specified in cm2. For big projected areas or deep moulds it is recommended to ask the customer for approval. There may be formulas to use in case those dimensions will be optimized
| Projected area (cm2) | The thickness between the insert edge and backside of A/B plate | The thickness between the cavity edge and backside of the insert edge | ||
| A-plate | B-plate | Insert-A | Insert-B | |
| 1-100 | 35-40 | 40-45 | 35-40 | 38-40 |
| 100-300 | 40-60 | 45-70 | 40-45 | 40-45 |
| 300-600 | 60-80 | 70-100 | 45-50 | 45-55 |
| 600-1000 | 80-110 | 100-130 | 50-60 | 55-65 |
| 1000-1500 | 110-140 | 130-160 | 60-65 | 65-70 |
| >1500 | ≥140 | ≥160 | ≥65 | ≥70 |
Finally if you are not sure what is best mold design solutions for your injection mold, you are welcome to contact us, we will offer you mold design, mold production and injection molding manufacturing service.


Leave a Reply
Want to join the discussion?Feel free to contribute!